FAQ: iPad Edition
How can I get the iPad App?
To install the SalesNOW iPad app users can login to their SalesNOW web account and select Setup > Install on iPad. This will send an iPad app installation link to the user. *Please note that the email will be sent to the user's username. If your username is not a real email, simply visit the App Store and search for 'SalesNOW' and install.
How do I send a log to the SalesNOW support team?
If you are encountering any synchronization issues or are having any other difficulties accessing the SalesNOW mobile application, be sure to send a log to the SalesNOW support team. By sending these logs our tech team will be able to identify the synchronization status of your device and will follow up with you directly.
To send the log open the SalesNOW app and select Options > Log > Send Log to Support.
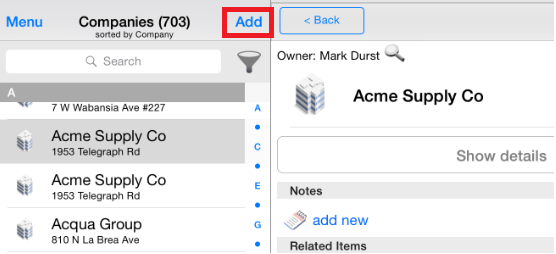
How do I create a new Record on the Device?
To create a brand new record in SalesNOW, select the tab that applies to the record you would like to add ( ie. to add a new Company visit the Company tab). Next, click Add at the top right of the
How do I delete SalesNOW records on the iPad device?
Users that have been given access to Delete records will be able to remove records from the SalesNOW iPad app. Please note that deleting a record from the app will also delete that record from the web as well. To do so open the record you wish to remove and select Edit. Next, scroll down to the bottom of the record and select Delete.

How to Synchronize the SalesNOW Mobile Application with the Web?
There are a number of scenarios that will cause the SalesNOW mobile App to synchronize with the web.
1. On Start-Up: The SalesNOW application will synchronize each time the app is launched.
2. By Saving: SalesNOW data will synchronize whenever a record is saved in SalesNOW. This could be a new record that is being created or any existing record that has been Edited.
3. Manual Synchronization: A final way for the App to Synchronize is to manually synchronize. To manually synchronize, please open the SalesNOW app and select Options > Data Synchronization > Synchronize!
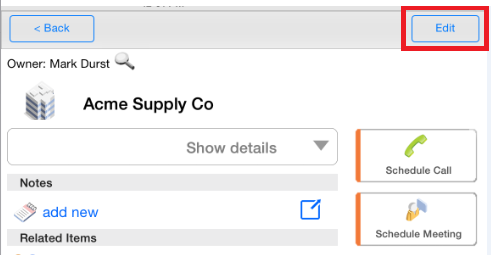
How do I Edit a Record?
To edit a SalesNOW record simply open the record that you would like to modify. Next click the Pencil icon at the top right hand corner of the record. After the necessary changes have been made simply click Save.
How do I send an email from the device that will be saved in SalesNOW?
Using the SalesNOW mobile application it is possible to send emails that will also be saved to SalesNOW. To do so, the user must launch the Mobile app and select the Contacts tab and open the Contact record that they would like to email. Next, the user must select the highlighted email address. They will then be taken to a compose Email screen from within SalesNOW. From here they can add a subject, and body of the email. Once the email draft has been saved it will be pushed to the device Outbox.
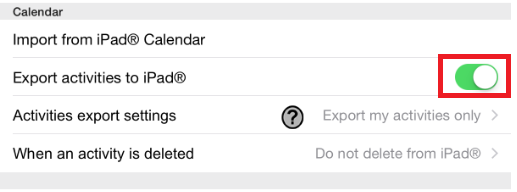
How can I Integrate SalesNOW with my iPad Calendar?
Using the SalesNOW iPad application it is possible to sync your SalesNOW Calendar entries with your mobile device calendar. To do this, please select Options > iPad Integration > and ensure that Export Activities to iPad has been turned on.
Calendar entries will then be sent to the device Default Calendar. To modify your default Calendar simply visit Settings on your iPad and select Mail, Contacts, Calendars
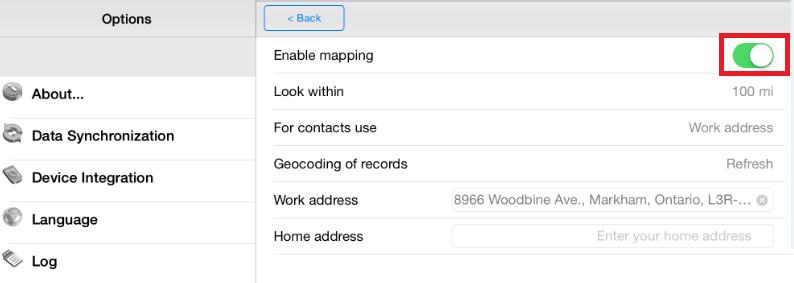
How can I enable Mapping?
The SalesNOW iPad app offers a number of advanced mapping tools. These include the ability to build routes to SalesNOW meetings and drop-ins,or to view those Contacts and Companies in your area listed by their proximity. To enable this ability a geo-stamp for all Companies must be logged. To enable geomapping, open the SalesNOW app and select Options > Location > Enable mapping.
How can I Search Nearby?
The Search Nearby tool allows users to sort their Contacts and Companies by the proximity of the Contact or Company to the current location of the user. Before turning on this sort, ensure that the tool has been enabled by visiting Options > Location > and Ensure Enable Mapping is in the on position. Beneath the enable mapping tool the user can then determine the scope of the Search near me tool. Users can change the Look within to be anything from 1 to 200 Miles. Finally, choose if you would like to search for the Contact Home or Work Address.
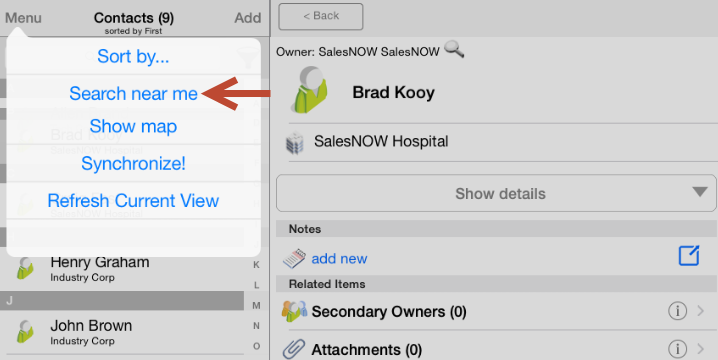
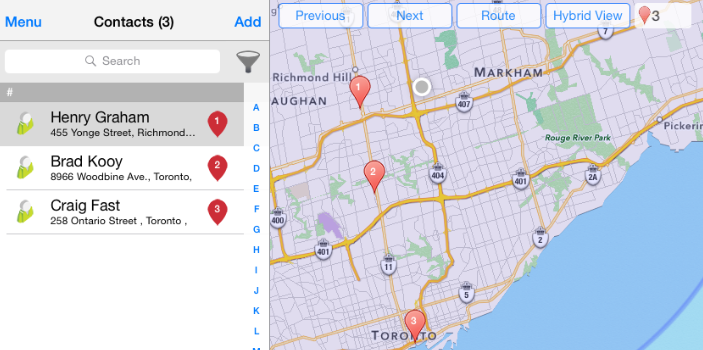
To use the Search Near Me, users can then open the Contacts or Companies tab and select Menu followed by Search Near Me. The device will then display All Contacts or Companies found in the Look Within range selected as well as the exact distance from the user's location. From this view users can build a Route to specific Contacts or Companies by selecting Route > Draw Route > Followed by Route Instructions. Here users can view the mapping instructions and either Send these instructions via email or open this route in the iOS Map.
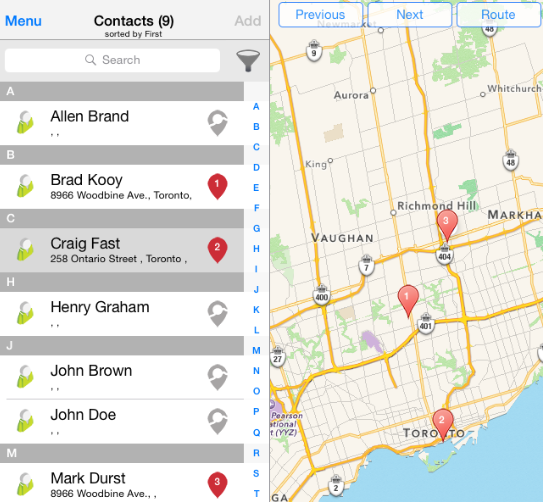
Map Customer
Before building a route to your SalesNOW Contacts and Companies please ensure that the Enable Mapping functionality has been turned on in the Location settings. (See Options > Location)
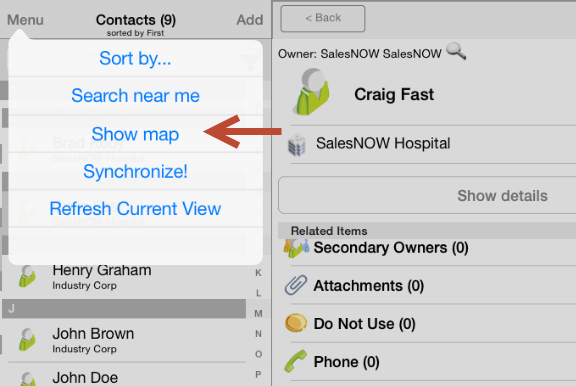
To map the locations of your Contacts and Companies, simply open the Contacts or Companies tab and tap Menu followed by Show Map. From this window you will see all of your SalesNOW Customers records listed with a cursor next to the name of each Customer.
*Note that the cursor will either be solid black or gray with a crack running through it. Those icons that are set to gray have not been geo-stamped and cannot be mapped to or added to a route. This is likely due to the contact Address information not being added or being incorrect.
Tap the cursor next to the names of all the Contacts or Companies that need to be added to this route. Please note that the current location of the user is used as the default start point. To modify the Starting or ending location, tap Route at the top of the screen to make any necessary changes to the Start Address. Once the Contacts or Companies have been added, and the Route Start and End location have been selected, users can select Route Instructions to view the mapping instructions and either Send these instructions via email or open this route in the iOS Map.
How do I Perform a Standard Search?
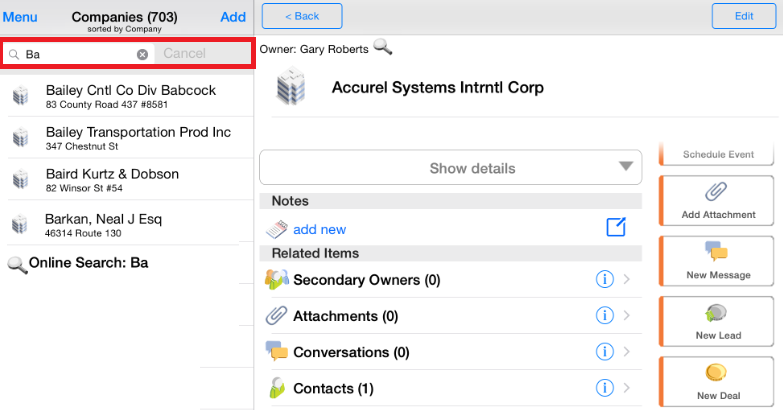
To search for a Contact or Company records in the iPad app, open either the Contacts or Companies tab and click into the Search box at the top left hand corner of the screen. Simply type in the full or partial Contact or Company name and the results will update the list below the search.
How do I force close the SalesNOW application?
Force closing closing the SalesNOW application is typically required after major changes have been made in the account. For example, if the account has been customized where fields or headers have been renamed. To force close the SalesNOW App (or any other app on your device) simply double tap the iPad button. What you should see next is the icons of all of your active applications along the bottom of the screen, go to the SalesNOW icon and swipe the window above the icon up and out of the screen. Next, return to the iPad home screen and re-open SalesNOW.

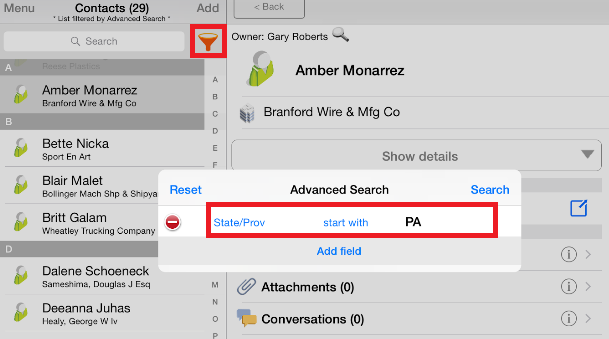
How do I Perform an Advanced Search?
The SalesNOW iPad application gives users the ability to perform Advanced Searches within the app. To perform an Advanced Search, open the Contact or Companies tab and tap the Funnel icon next to the Standard search box.
Next, select Add Field, and pick the field that you would like the search against. Users can add additional search fields to refine the search by tapping Add Field. Once the search criteria has been entered users can then select Search. After a search has been initiated users will only see those Contacts or Companies that met their search criteria. Another indication that the user is viewing Advanced Search results is that funnel icon will be highlighted in orange. To clear out the search and show all Contacts or Companies, simply tap the Advanced Search funnel icon and tap Reset.
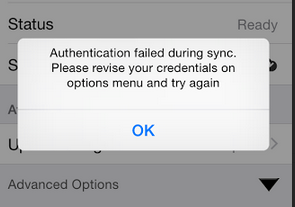
I changed my password on the web and am now receiving an "Authentication Error" on my iPad
After a SalesNOW password has been modified on the web, the updated password must be applied to the SalesNOW Mobile app as well. To update, users can simply open their SalesNOW iPad app and select Options > Security > Update Password. From here users can input the updated password information. Once the password, has been updated, return to Options and select Data Synchronization > Synchronize to ensure that the iPad app is once again connecting to SalesNOW on the Web.